- All
- Product Name
- Product Keyword
- Product Model
- Product Summary
- Product Description
- Multi Field Search
Views: 20 Author: Site Editor Publish Time: 2026-05-21 Origin: Site


Achieving consistent product quality while minimizing cycle times and steam consumption is a daily challenge for facility engineers. Success in this area requires precise control over thermodynamics and fluid mechanics during the entire manufacturing cycle. When production bottlenecks occur, they usually stem from poorly calibrated temperature intervals or inefficient cooling stages. Identifying these operational flaws and deploying the correct equipment mitigates these risks effectively.
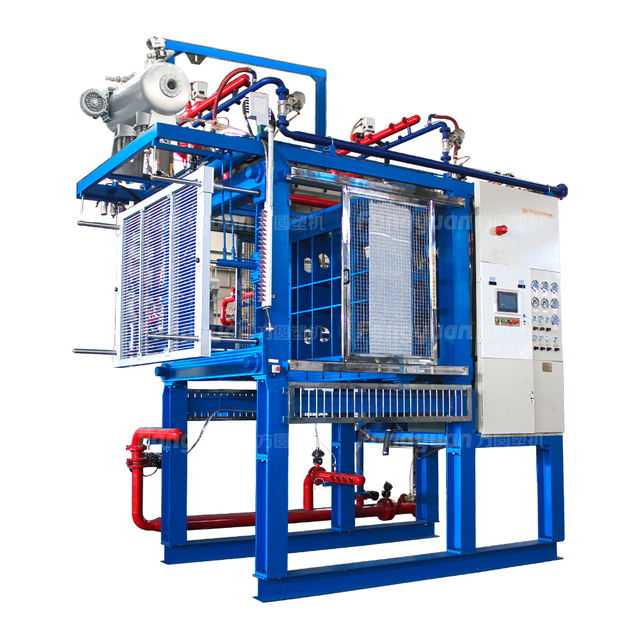
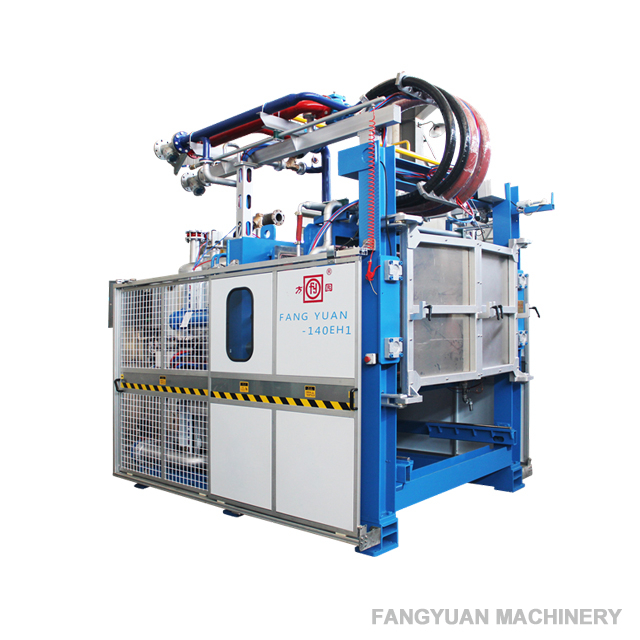
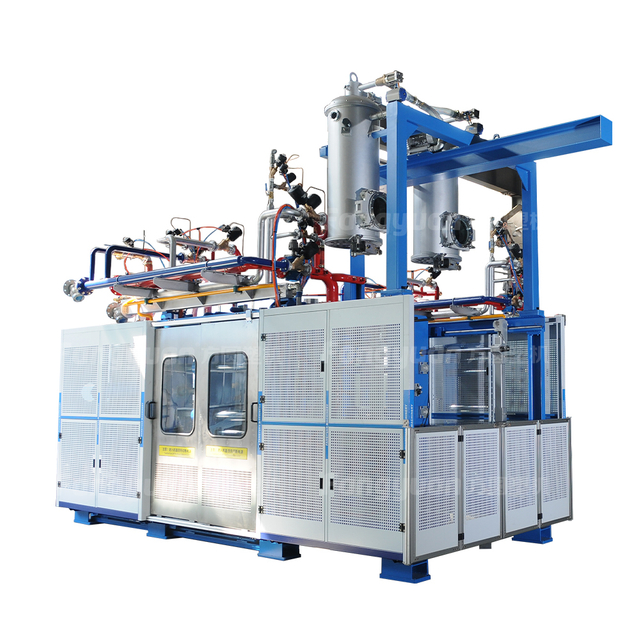
This guide breaks down the exact operational steps of the EPS shape moulding process. It speaks directly to production managers, facility engineers, and procurement teams evaluating high-volume manufacturing solutions. You will discover how advanced vacuum cooling, dual-stage heating, and optimal tooling configurations streamline production. By understanding these core mechanisms, you can align your operational goals with machinery that guarantees structural integrity.
The EPS shape moulding process relies on exact temperature and pressure intervals (ranging from 100°C to 130°C) to expand and fuse pentane-loaded polystyrene beads.
An optimized cycle requires advanced vacuum cooling and two-way heating to reduce moisture, save energy, and shorten the production loop.
Choosing the right EPS Shape Moulding Machine depends heavily on part complexity, tooling costs, and required production volume versus standard block molding.
Implementation success hinges on consistent raw material conditioning and rigorous mold maintenance to prevent surface defects.
Operators must prepare raw polystyrene beads properly before they enter the molding cycle. This preparation sets the physical foundation for the final product.
The pre-expansion phase alters the basic physical state of the polystyrene. Machines inject steam at temperatures ranging between 100°C and 120°C into a chamber containing the raw beads. The heat vaporizes the blowing agent, typically pentane, trapped inside the polymer shell. This vaporization causes the beads to expand rapidly. The process drastically increases their volume while simultaneously decreasing their overall density. This exact density establishes the baseline physical properties for the finished part.
Expanded beads cannot go directly into a mold. They require a dedicated stabilization period known as aging. Facilities typically store them in large mesh silos for 6 to 24 hours. During this phase, ambient air gradually permeates the cellular structure of the beads. This balances the internal pressure against the external atmospheric pressure. Industry experts refer to this as the "internal spring" effect. The trapped air provides the necessary secondary expansion force required for the final fusion stage. Skipping or rushing this aging step is a common operational mistake. It inevitably leads to product shrinkage, poor fusion, and rejected batches.
The actual shaping cycle transforms loose, conditioned beads into rigid structural components. You must control heat, pressure, and timing precisely across six distinct stages.
Step 1: Clamping and Mold Preheating
The cycle begins by engaging the machine’s hydraulic or pneumatic clamping system to lock the mold halves together. Once locked, the system activates "boot heating." This step introduces initial steam to ensure a uniform mold temperature. Warming the mold cavities prevents thermal shock to the material upon entry.
Step 2: Material Filling (Loading)
Next, automated feeding systems drive the conditioned beads into the mold. Machines utilize either pressurized air or vacuum-assisted suction to pull the material. These systems ensure an even distribution of beads, especially within complex mold cavities containing intricate geometries.
Step 3: Steam Injection and Core Penetration
Operators then inject high-temperature steam directly into the filled mold. Temperatures range from 110°C to 130°C. The heat softens the expanded beads, pushing them to their 90–100°C softening point. A delicate trade-off exists here. Operators must balance "apparent fusion" for smooth surface quality against "core heating" for internal structural integrity. Deeper core heating creates stronger parts but consumes significantly more steam.
Step 4: Two-Way Heating and Insulation (Holding)
Advanced equipment utilizes cross-steaming. This pushes steam from one side of the mold to the other, guaranteeing uniform fusion across thick product sections. After cross-steaming, the system shuts the supply valves. This initiates an insulation phase. The machine utilizes residual heat to hold the temperature steady. This technique improves surface finish while actively conserving energy.
Step 5: Vacuum and Water Cooling
The system transitions rapidly to cooling. It opens water valves for initial precooling, followed immediately by intensive vacuum cooling. A robust vacuum is critical for modern operations. It rapidly extracts residual heat and internal moisture. Furthermore, it creates a negative pressure environment. This aids in demolding and drastically shortens cycle times compared to passive ambient air cooling.
Step 6: Ejection and Post-Molding Curing
Finally, mechanical ejector pins or compressed air blasts safely release the molded part. Freshly ejected parts mandate a brief open-air curing period. This resting time normalizes internal air pressure and prevents secondary distortion.
The table below summarizes the core thermodynamic targets for these operational stages:
Process Step | Temperature / Condition | Primary Function |
|---|---|---|
Pre-Expansion | 100°C – 120°C | Vaporize pentane, lower material density. |
Mold Preheating | Varies by tooling | Prevent thermal shock to incoming beads. |
Core Penetration | 110°C – 130°C | Soften beads, initiate internal fusion. |
Vacuum Cooling | Negative Pressure Environment | Extract moisture, solidify product rapidly. |
Selecting the right production strategy requires understanding your specific output objectives. Facilities must align their investments with the geometry and volume of their required products.
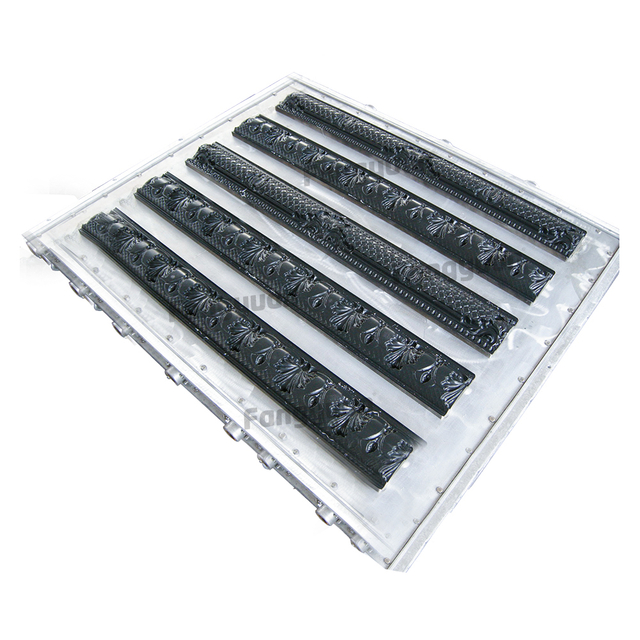
These two processes serve fundamentally different end goals. Shape moulding generates finished, complex geometries straight out of the machine. It creates items like protective packaging or contoured automotive parts. Conversely, block moulding produces massive, rectangular billets. Manufacturers use these solid billets as raw stock for secondary hot-wire cutting processes.
An EPS Shape Moulding Machine requires high-precision, product-specific molds. These molds often feature intricate inserts or undercuts. They represent a higher initial capital expenditure for the facility. However, they yield finished goods immediately, resulting in zero secondary cutting costs. Block molding utilizes simple, large-scale rectangular cavities. The initial tooling cost is low, but the secondary processing is labor-intensive.
We frame block molding as the optimal choice for low-volume production featuring highly variable sizing. You can cut a single block into hundreds of different sheet dimensions. Shape moulding remains the definitive choice for high-volume, standardized production. It dominates the manufacturing of protective packaging, structural automotive components, and appliance insulation.
Here is a quick comparison chart detailing the primary differences:
Evaluation Metric | Shape Moulding | Block Moulding |
|---|---|---|
Output Geometry | Complex 3D shapes | Large rectangular billets |
Tooling Complexity | High (custom molds required) | Low (standard block cavity) |
Production Volume Focus | High-volume, standardized | Low-volume, variable sizing |
Secondary Processing | Minimal (ready to ship) | Extensive (hot-wire cutting) |
Facility managers constantly seek ways to maximize output while minimizing utility overhead. Modern equipment integrates specific technologies to achieve these optimizations.
Steam generation usually represents the highest utility expense in a facility. Operators must understand how steam pressure settings directly impact overall operational costs. Pushing higher pressure speeds up core heating but wastes energy if the mold cannot retain it. A centralized steam accumulator is an absolute necessity. It ensures a stable volume of steam is available instantly, preventing pressure drops across multiple machines.
Cooling dictates the overall length of the manufacturing cycle. Dual-stage cooling represents the primary driver of cycle time reduction in a modern EPS Machine. By combining localized water spray valves with a high-capacity vacuum pump, the system drops the internal core temperature rapidly. Faster cooling translates directly to higher hourly throughput.
Human error causes a significant portion of rejected parts. Programmable Logic Controller (PLC) systems eliminate this variability. They monitor sensory data in real time, maintaining exact heating and cooling tolerances. Precise automation keeps the scrap rate near zero and ensures consistent part weights.
Even properly calibrated lines occasionally produce defective parts. Operators must diagnose these issues rapidly to prevent material waste.
Uneven Material Distribution
Symptom: The ejected part shows weak spots or inconsistent density across its surface.
Solution: You should recalibrate the blow-fill air pressure. Additionally, inspect the small mold vents (core vents) for blockages caused by melted polymer.
Poor Core Fusion
Symptom: The product breaks easily under pressure, or individual beads shed away from the core structure.
Solution: Increase the core heating duration slightly. If the problem persists, adjust the steam penetration pressure to force heat deeper into the cavity.
Surface Blistering or Shrinkage
Symptom: The geometry deforms visibly post-ejection, pulling inward or forming raised blisters.
Solution: Extend the vacuum cooling cycle to solidify the interior completely. You must also verify that the aging process during pre-moulding was fully completed.
Procurement teams face a dense market of equipment providers. Shortlisting a reliable manufacturer requires a strict focus on mechanical and software capabilities.
Mechanical Rigidity and Clamping Force Robust frame construction matters immensely. High-density applications generate massive internal pressure during the expansion phase. A rigid frame with superior clamping force prevents mold flashing, where material escapes the mold seams.
Valve and Piping Architecture Evaluate the quality of the steam and water proportional valves. These exact components dictate the precision of the two-way heating and dual-stage cooling steps. Cheaper valves react slowly, wasting steam and extending cycle times.
Software and Usability Look for intuitive Human Machine Interface (HMI) panels. Good software allows operators to save specific part recipes. Storing exact steam times and cooling durations enables rapid changeovers between different product runs.
Vendor Support and Commissioning Choose a manufacturer that provides extensive field support. On-site calibration, mold trial runs, and comprehensive operator training dictate how quickly your facility achieves positive cash flow from the new asset.
Mastering the EPS shape moulding process requires balancing material science with precision engineering. The expansion, fusion, and stabilization of polystyrene rely entirely on strict environmental controls. Long-term profitability and sustainable production metrics rely on selecting an EPS Machine equipped with advanced thermodynamic controls. Prioritize models featuring high-capacity vacuum cooling, robust proportional valving, and rigid frame architectures. We strongly encourage you to audit your current cycle times. Consult with an application engineer to match machine specifications directly to your exact product portfolio.
A: A typical cycle ranges between 30 to 120 seconds. The exact duration depends heavily on the thickness of the part, the required material density, and the efficiency of the machine's cooling technology.
A: Shape moulding machines produce custom, three-dimensional finished parts using dedicated molds. Block machines produce bulk rectangular billets that require secondary hot-wire cutting to achieve their final dimensions.
A: Vacuum cooling rapidly extracts residual heat and moisture from the mold core. This process ensures dimensional stability, prevents post-ejection shrinkage, and significantly speeds up overall production cycles.
A: Operators typically inject steam at temperatures between 110°C and 130°C. Maintaining highly stable pressure is far more critical than achieving maximum pressure to ensure uniform core fusion.